How To Lock And Unlock Word Document?
There are various files which contain sensitive information and thus needs to be locked so that the contents are not altered accidentally. MS office word provides you the feature to lock as well as unlock your files so that you can keep your data confidential.
Here, we shall discuss the right ways of locking and unlocking a MS office word file.
How To Lock An Ms Office Word File?
You can lock a file by providing a password. Once you save the file with the password, for editing the file or accessing it for even reading purpose, you would be required to provide the password.
- Write the text on your MS office word file. After completing your writing, hit the “Save As” option by clicking on the MS office button.
- When the dialog box opens, you can find “Tools” written on the bottom left part of the dialog box. Click “Tools”.
- Select “general options” which is provided in the tools menu.
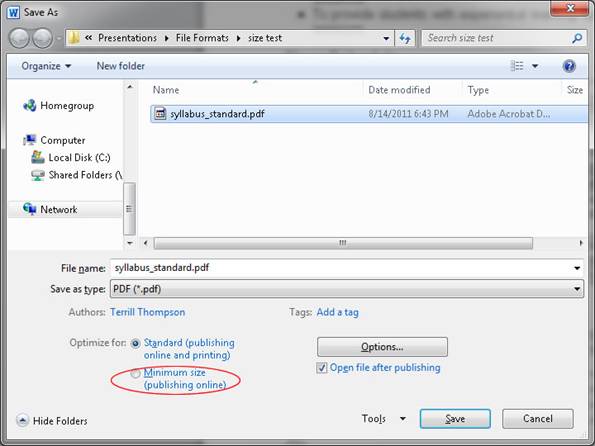
Click the tools as you can see in the bottom right corner.
- A new dialog box opens which has two fields namely:
- Password to open
- Password to modify
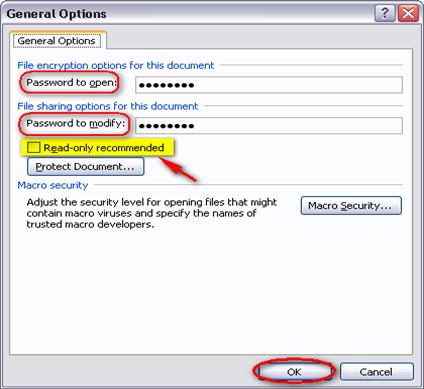
The fields as you see for entering the password for locking the document.
- If you want to protect the file for modification work only, type a password for the modification field or otherwise enter the password in the first field. Doing so would require the password upon opening the document itself.
You can also lock specific segments of the Word file as well for which there is another procedure which we shall describe too.
- Open the MS office word document.
- Move over to the review tab provided at the top most rows.
- Click the “Protect” option.
The screenshot for the same has been provided here.
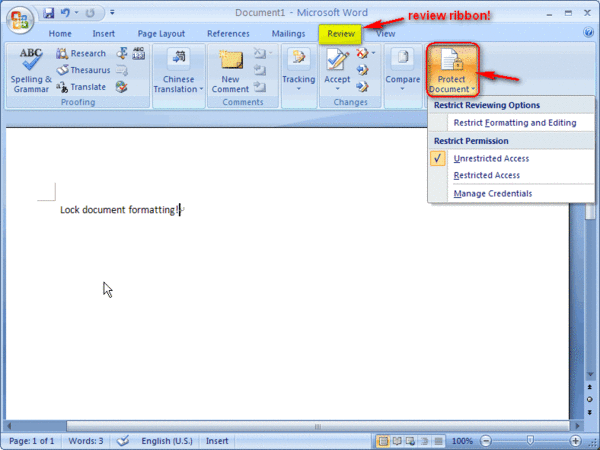
- A dropdown list is found. Click on the “restrict formatting and editing” button.
- There is an option entitled “allow only this type of editing in the document”. Enable the option.
- Select the option”No changes, Read only”.
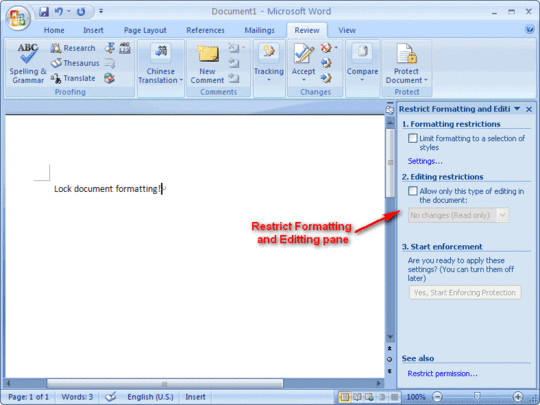
This screenshot shows the above mentioned steps.
- Move over to the text section and select the parts which you DO NOT want to protect. For multiple scattered selections, use control key while selecting. Remember, the UNSELECTED PORTION gets protected.
- If you want protection from everyone, select “Everyone” from exception section. It is an optional tab and can be left as it is.
- Click on the final step which says “Yes start enforcing protection”.
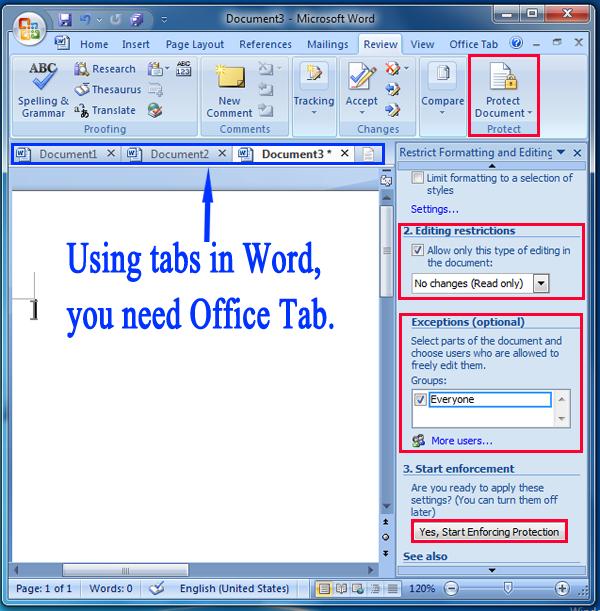
Thus, the selected parts are locked.
- A new dialog box opens where you can enter the password. Enter the password and hit OK.
- The portions of your file are protected.
Thus, this was the right way of locking a file. Now, we head to the right ways of unlocking a protected file.
- For password protected file, open the MS office word document.
- It prompts you for a password, enter the password and hit OK.
- The file is opened. Now click “Save As” from the MS office button.
- When the dialog box opens, click “Tools” present at bottom right corner.
- Select “Security options” and in the dialog box that opens remove the password fields and click OK.
- Hit Save.
- The file has been unlocked for future use.
- For unlocking selected fields which might be locked, the process is even simpler.
- Simply pressing control + shift + F11 keys simultaneously should unlock the locked fields.
If you have a password protected file which can be read but cannot be modified and you have forgotten the password, you need to do the following.
- Copy the contents of the word file.
- Open a new file by selecting new form MS office button.
- Paste the copied contents in the new file.
- Go to the review section and hit the protection tab.
- Move over to the “Restrict editing and formatting pane” and click “Stop protection”.
- The file is unlocked and can be used.
Thus, these were the basic ways of locking and unlocking a MS office word file.
